Dissimilar Pipe Coupler
Installation Guide
Follow our easy, step-by-step directions with photos. If you have any questions along the way, give our engineering team a call at (843) 335-5814 Mon-Fri 8AM-5PM EST.
Introduction
Equipment
- Dry rag or medium-bristle brush
- 5/16″ ratchet, nut driver, or a screwdriver (< 30″ OD only)
- Shovel to dig bell hole (horizontal applications only)
- Work gloves (Mechanix or similar)
Conditions
- Ambient temperature between 41-125°F
- Coupler near room temperature
- Construction adhesive encouraged for wet or cold applications
Introduction
Preparation
- Access to the full circumference of the joint is required. Dig a bell hole if necessary.
- Inspect the outside of the joint surface, making sure there are no loose materials or voids.
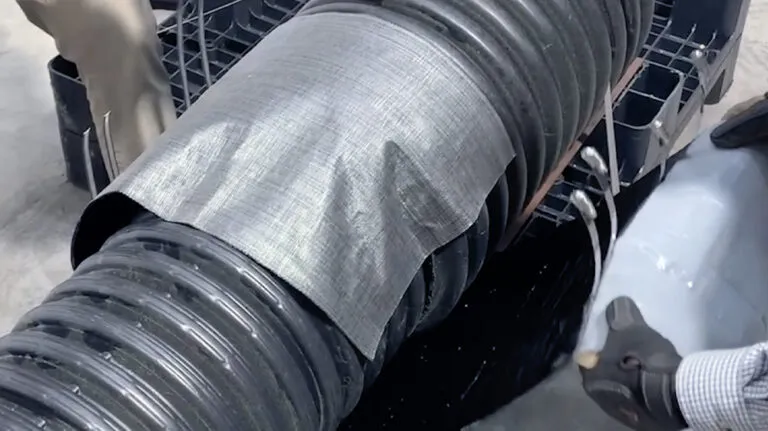
- Unroll the coupler & inspect for any damage prior to installation.
Notes
- Refer to fig.1-4 on the next steps for compression band position & spacing.
- The following diagrams are the most common connection types. Contact our engineering team for directions pertaining to other pipe connections.
Introduction


Introduction


Choose connection type

Dissimilar Pipe Coupler
Guía de instalación
Siga nuestras sencillas instrucciones paso a paso con fotografías. Si tiene alguna pregunta en el camino, llame a nuestro equipo de ingeniería al (843) 335-5814 Mon-Fri 8AM-5PM EST.
Introducción
Equipo
- Trapo seco o cepillo de cerda mediana
- Trinquete de 5/16″, llave de tuercas o destornillador (solo < 30″ de diámetro exterior)
- Pala para cavar el hoyo de la campana (solo aplicaciones horizontales)
- Guantes de trabajo (Mechanix o similar)
Condiciones
- Temperatura ambiente entre 41-125°F
- Acoplador cerca de la temperatura ambiente
- Se recomienda adhesivo de construcción para aplicaciones húmedas o frías.
Introducción
Preparación
- Se requiere acceso a toda la circunferencia de la articulación. Cava una campana si es necesario.
- Inspeccione el exterior de la superficie de la junta, asegurándose de que no haya materiales sueltos ni huecos.
- Desenrolle el acoplador e inspeccione si hay daños antes de la instalación.
Notas
- Consulte la figura 1-4 en los siguientes pasos para conocer la posición y el espaciado de la banda de compresión.
- Los siguientes diagramas son los tipos de conexión más comunes. Comuníquese con nuestro equipo de ingeniería para obtener instrucciones relacionadas con otras conexiones de tuberías.
Introducción
Introducción
Elija el tipo de conexión
Dissimilar Pipe Coupler
Guide d'installation
Suivez nos instructions simples, étape par étape, avec des photos. Si vous avez des questions en cours de route, appelez notre équipe d’ingénierie au (843) 335-5814 du lundi au vendredi, de 8 h 00 à 17 h 00, fuseau horaire de l’Est.
Introduction
Équipement
- Chiffon sec ou brosse à poils moyens
- Cliquet 5/16″, tourne-écrou ou tournevis (< 30″ OD uniquement)
- Pelle pour creuser un trou de cloche (applications horizontales uniquement)
- Gants de travail (Mechanix ou similaire)
Conditions
- Température ambiante entre 41 et 125°F
- Coupleur proche de la température ambiante
- Adhésif de construction encouragé pour les applications humides ou froides
Introduction
Préparation
- L’accès à toute la circonférence du joint est requis. Creusez une cloche si nécessaire.
- Inspectez l’extérieur de la surface du joint, en vous assurant qu’il n’y a pas de matériaux meubles ou de vides.
- Déroulez le coupleur et inspectez tout dommage avant l’installation.
Remarques
- Reportez-vous à la fig. 1-4 pour les étapes suivantes pour connaître la position et l’espacement de la bande de compression.
- Les schémas suivants représentent les types de connexion les plus courants. Contactez notre équipe d’ingénierie pour les instructions relatives aux autres raccordements de tuyaux.
Introduction
Introduction
Choisissez le type de connexion